

Thursday, August 30, 2012
Make It Monday #80: Making Garland
Ashley's our
Make-It-Monday Gal this week as she shares her tips for making any shape
into a trendy garland to put on your projects. We love anything that
makes dies and stamps more versatile, so this tip is right up our
alley.
 This is the card I made using this 'garland' technique...Since I needed a baby boy card, I thought I would pull out Sweet Baby Stamps and ink up the elephant...and they are all tied together with bows at the tail! I used the star die for the elephants to walk on...thanks for taking a look!
Sunday, August 19, 2012
A Blog Named Hero...Challenge # 10 Krafty Crafter
For this challenge incorporate kraft cardstock or kraft colored ink. And
as always, feature Hero Arts if you can, but you may still participate
if you don't.

 Would you like to play along with this challenge? Well, go HERE to check out all the details and see what the other team members made.
The cake stamp and the sentiment stamp are Hero Arts stamps, all the paper is from Papertrey Ink. I used a sketch from sfytt March 2012.
 Would you like to play along with this challenge? Well, go HERE to check out all the details and see what the other team members made.
The cake stamp and the sentiment stamp are Hero Arts stamps, all the paper is from Papertrey Ink. I used a sketch from sfytt March 2012.
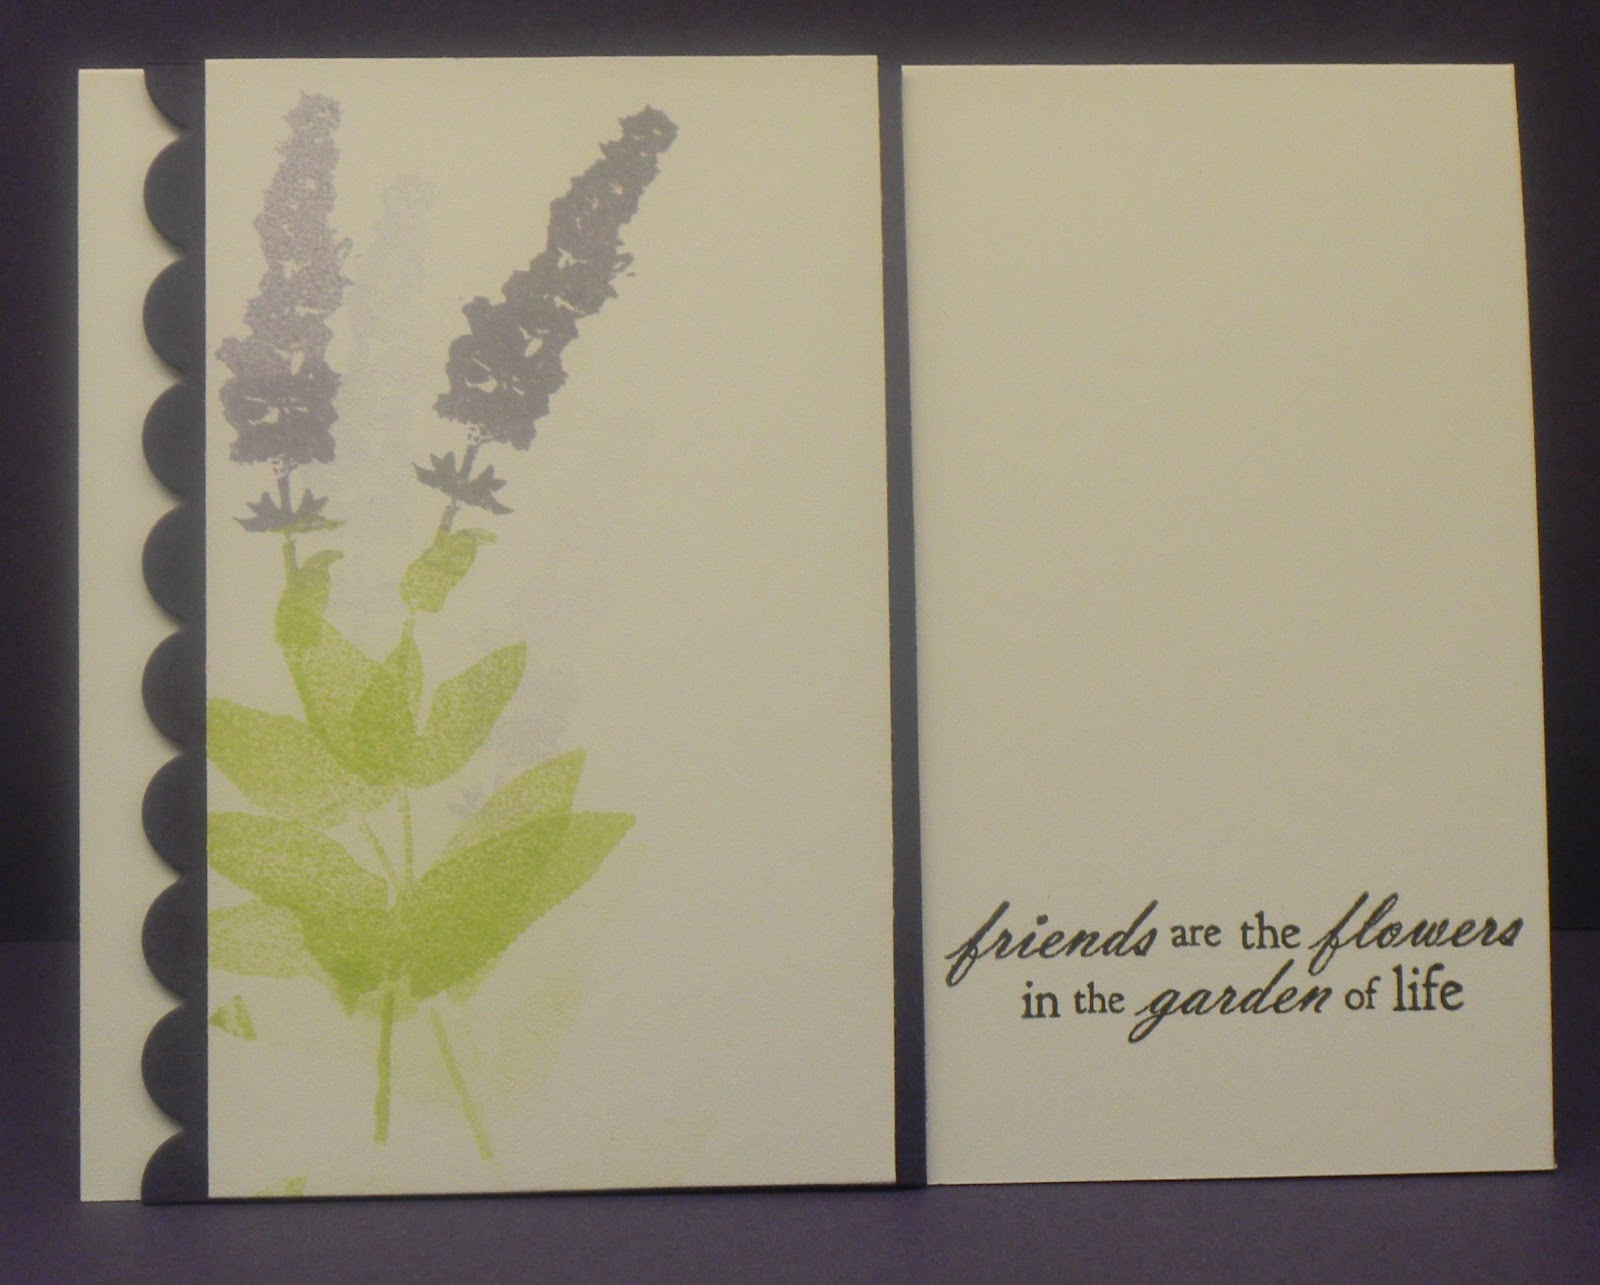
Natural Beauties

Saturday, August 18, 2012

Friday, August 17, 2012
A lot more Floral Foliage
This is such a cute little $5 stamp set...I stamped it on Soft Stone paper and I used a lot of different color inks, the trunk is kraft ink...then I layered either the heart border die or the vine die and used an assortment of sentiments. I added glossy accents to the center of many of the flowers, sure looks shiny in real life and makes the flowers pop...I noticed the scarlet jewel is especially pretty with the glossy accents. I adhered the stamped paper to a kraft card. And I even added another paper inside for the writing and used the cluster of three flowers that comes with the set all along the side...I think this will be the perfect size to wrap up as a gift set...not too big, just the right size for a sweet note inside (these are all 3.5 x 5 inch cards...I just ordered some envelopes for this size). What do you think?


A Special Birthday Card....
I have mentioned before that my BFF and I have been friends for 55 years...her family was my family and vice versa...we spent a lot of time at each other's homes...I would stay with her one weekend, she would stay with me the next...so really her parents became my parents...her father is Hispanic...his family originating from Spain ...and one thing that he ALWAYS said to me was: "I need a paintbrush to paint your blue eyes brown"!!...I suppose then I would "belong" in the family! ha ha...still have those blue eyes and he is still hanging on...he will be 92 on the 29th of this month...WOW! I had to make a special birthday card for him...and I guess I don't know how special this really is, but I pulled out Make A Wish stamp set and also Script Sentiment...I die cut some layers of a 'cake' and one layer HAD to be chocolate (for me and his two daughters, at least!!)...I think he will like this card. I think it has a masculine feel to it, what with the brown and melon berry colors!
So since he does NOT have a computer, I can post it now and he will not see it before it comes to him in the mail!
 So to my 'second father', Happy happy Birthday! Love, col
So since he does NOT have a computer, I can post it now and he will not see it before it comes to him in the mail!

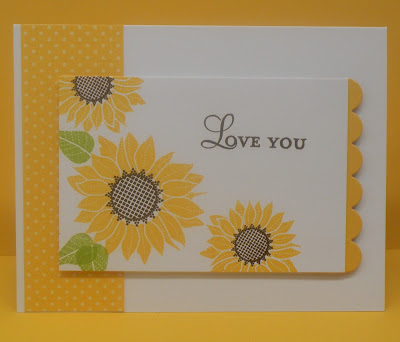
Another Simple Sunflower Card

CASology Week #6: SCHOOL

Math Lesson: 1 main focal image + lots of open space + limited layers & embellisments
= a quick & easy CAS card

My main focal image is the pencil, the sentiment speaks to a teacher...lots of open white space...no layers or embellishments...= my very quick and easy CAS card!!
Go HERE to play along with this weeks theme being "school".
All products are Papertrey...stamps are from Happy Trails stamp set, ink is Kraft
Edited to add the line movement of the pencil! Thanks friend for the suggestion! Love it when you help me think outside the box...or just "think" period!!
And fortunately I had not linked it up yet!
Edited to add the line movement of the pencil! Thanks friend for the suggestion! Love it when you help me think outside the box...or just "think" period!!
And fortunately I had not linked it up yet!
Thursday, August 16, 2012
Simple Sunflower....love that stamp!
I saw the Retro Sketches from a few weeks ago and decided to pull out my sunflower stamp and get busy...I basically followed the sketch, but did turn it on its side and reversed a few things too...and I had a wonderful assortment of colors for the sunflowers...I was thinking more along the lines of the painted daisies!! Here are the four cards I made...it is time to be sending some cards to my aunts, so I think these will be the ones that will be mailed to them. I saw one aunt this last weekend at a family reunion...she is 93...what a doll...just the cutest little old Italian lady in her "mumu" dress!! I love her!


 |
| And my sweet little Auntie Elvera! |
Wednesday, August 15, 2012
The Sweet Life...
Hot, Hot, Hot today...so what is one suppose to do? Stay inside and play!!! I cleaned up a lot of things on my desk and then pulled out The Sweet Life and the Mega Vases and played around...This is what I came up with:
 I embossed with clear embossing powder a small "flourish", then I rubbed the antique linen distress ink over it, then I cut it out with the die...For my flower I used pure poppy stamped off once for the first layer, then stamped again and finally the third layer is stamped with scarlet jewel ink...I wanted a red rose and I have achieved what I wanted...

Sunday, August 12, 2012
Make It Monday #77: Ink Pads As Watercolors
This is the last day to post a card for last Monday's MIM from Papertrey Ink...you can go HERE to watch the video that Dawn McVey made for using your ink pads as water colors for your image. Truth be told, I tried earlier in the week playing around with this and was not impressed with my water coloring...so I didn't pursue it any more. Then today as I was "skyping" my BFF and she was making yet ANOTHER card for this weeks MIM, I thought I best try it again...So I took down the tulip stamp from Friendship Jar: Spring Fillers and gave it another go. I have a loooong way to go to perfect this technique...but these are the colors I used: lemon tart, harvest gold, summer sunrise and finally orange zest...for the leaves: new leaf and ripe avocado.
 I tied the bouquet of flowers with some Twinery twine and the sentiment is from Fillable Frames # 7. Okay, one thing I wish I had NOT done was add some glossy accents to some of the leaves and tips of the flower petals...but too late now!!

Wednesday, August 8, 2012
Girl and boy Party Invitations


I am now making some baby shower invitations in the same way and will again include a post card thank you. These are fun and easy to make and I hope they sell!
Tuesday, August 7, 2012
Retro Sketches # 23

The card is Aqua Mist, I stamped the center strip with the PTI Medallions in Hawaiian shores and simply chartreuse. Hawaiian shores paper is used as a border for the medallion. I took four squares from the Take Three die and stamped it first with the bitty dot stamp from Background Blocks in soft stone ink, then I stamped some of the small butterflies from Beautiful Butterflies. The "hello" is from Heart 2 Heart # 4.
I took this sketch from HERE at Retro Sketches if you want to play along!

A little "Hostess Gift"
This Saturday I am heading up to the Seattle Washington area for a BIG family reunion...we have it every year! This year as in the past several it has been hosted by my cousin. He and his wife have horses and their house decor is about horses and western "things" and it is beautiful! There may be up to 90 of us this Saturday, invading his house and yard..kids included! So while at the beach a week back with my BFF, Linda, I saw this pot holder and dish towel with horses on them and decided right then I needed to buy them as a "Thank YOU" for hosting this family reunion (and 90 is NOT all of us...we are a big Italian family!) So I had to make the cover for this bag and of course I had to include a horse or two...It is an old Hampton Art rubber stamp Studio G...just a cute little horse, I decided not to color him, just leave him as is...I think they will appreciate this little gift.

 I will need to add some tissue and some raffia perhaps!!~


Finishing up some SAf projects
I have a little box on my desk that had some 'beginnings' of cards from the SAF day...so I decided it was time to finish them up and get them done. A couple of the cards I finished I already posted similar ones using Betsy's technique with the lunch sack card set...so I will not bore you with those.
The next card was one that Linda and I made using the shaving cream technique...I pulled out two jelly roll pans because it has a bit of an edge all around it...then we sprayed the cream on it...and we put way too much...it has a life all its own...it just foams up to three times the size we thought we were putting on the tray...anyway, she pulled out some red, yellow and orange re-inkers, I pulled out hawaiian shore, aqua mist and chartreuse green, then we traded pans...Oh and Linda shared this story on her blog, but I never did here, so she takes my pan and places in on her counter space and somehow the pan falls OFF the counter, UPSIDE DOWN...and we look at each other and think: OH NO!!! What a mess! But it ALL stayed in the tray...just one tiny drop was to be wiped up...we soooo lucked out with that little mishap!
This card was made using her reinkers...fun fun technique, in fact my two grand daughters popped in and when they saw what we were doing, they too wanted to try it! And they did and it all turned out great! So the background for this card was made with shaving cream. After putting drops of reinker onto the cream, we took the end of a paint brush and swirled it all around to mix up the colors...then you push your paper into the cream...push really good and then lift it up...a lot of the shaving cream sticks to the paper, but what you do is take a cardstock and scrape off the cream and voila...you have a fantastic one of a kind design on your paper...so cool...and the paper feels so soft after scraping off the shaving cream. If you are interested in watching this technique by Nichole on her blog then go HERE and scroll down a bit until you get to the third video for the Marbelized Tie -Dye technique!
 My marbelized paper is mounted on a pure poppy card stock. I used the Layerz Mat Stack #3 in black and die cut three different butterflies...the top one I ran through my crimper and added a couple of blings. "Merci" for taking a look!!
The next card was one that Linda and I made using the shaving cream technique...I pulled out two jelly roll pans because it has a bit of an edge all around it...then we sprayed the cream on it...and we put way too much...it has a life all its own...it just foams up to three times the size we thought we were putting on the tray...anyway, she pulled out some red, yellow and orange re-inkers, I pulled out hawaiian shore, aqua mist and chartreuse green, then we traded pans...Oh and Linda shared this story on her blog, but I never did here, so she takes my pan and places in on her counter space and somehow the pan falls OFF the counter, UPSIDE DOWN...and we look at each other and think: OH NO!!! What a mess! But it ALL stayed in the tray...just one tiny drop was to be wiped up...we soooo lucked out with that little mishap!
This card was made using her reinkers...fun fun technique, in fact my two grand daughters popped in and when they saw what we were doing, they too wanted to try it! And they did and it all turned out great! So the background for this card was made with shaving cream. After putting drops of reinker onto the cream, we took the end of a paint brush and swirled it all around to mix up the colors...then you push your paper into the cream...push really good and then lift it up...a lot of the shaving cream sticks to the paper, but what you do is take a cardstock and scrape off the cream and voila...you have a fantastic one of a kind design on your paper...so cool...and the paper feels so soft after scraping off the shaving cream. If you are interested in watching this technique by Nichole on her blog then go HERE and scroll down a bit until you get to the third video for the Marbelized Tie -Dye technique!

Sunday, August 5, 2012
Floral Foliage
This is a cute little $5 stamp set...love the sentiment! And the tree looks great in a lot of different colors...not your standard "green"! I went with the smaller size card...3.5 x 5 inches...now to find some envelopes ...
 My first card on the right I used spring moss to "ground" the tree...then when I was thinking about the second card and the sentiment, I thought I would use a strip of the heart border die in simply chartreuse (mainly because I already had that cut!!) But I like it only part way across the card and then I kept the same color, berry sorbet for the sentiment...Hard to see in the picture, but I did use some Glossy Accents in the center of the bigger flowers on the tree...looks nice in real life!

Saturday, August 4, 2012
Another Natural Beauties Card
Last one for the night...my mojo was really going strong today...now watch, I will have NOTHING tomorrow!!
 I stamped the background with PTI Background Basics: Tin Types and stamped the little flower randomly in the squares...the little flower is part of this Natural Beauties set. The leaves are from Turning a New Leaf. the sentiment is from Embellishments...my die is the heart border die from PTI! Thanks for taking a look! This card was just for fun!!

CAS-ual Fridays # 64 card 2 On Cloud Nine

One more card for the CAS-ual Fridays...I think this is pretty self explanatory with the sun, the bird and of course the clouds...most of the stamps are from PTI Bird Watching, the sun is from Back Pocket Basics. Thanks for taking a look.
 HERE is the link for checking it out.
CAS-ual Friday # 64

I haven't played with Floral Foliage yet and I was reminded by my BFF (in fact, I stole her idea...she said she was going to make something with that tree...) We are skyping, so I jumped right on it and whipped this baby out in less than 5 minutes!! It is a 3.5 x 5 card..I am liking this size a lot...less space to fill in!! And I love the Happy Trails stamp set, but I don't think I have used that little paper airplane yet, so I inked it up and away we go...the grassy hills were made a scrap paper from the In The Meadow die...I just used a sponge and inked it up.
Hope you all are having a great weekend...it was 102 degrees here in Oregon today...quite unusual, in fact it has been three years since we have had those kind of temperatures!! Definitely a good day to be in the craft room!!
Check it out HERE.
More Sweet Life Roses

The Sweet Life ...continued
It is official, today was 102 degrees (38.888 for my celsius friends in the Netherlands) so I stayed in my craft room getting inky all afternoon and occasionally my husband would call me in to watch some Olympics...
Here is my second card using the beautiful roses from The Sweet Life...I used the technique from Betsy Veldman that she showed during SAF, you can see it on the video HERE, just scroll down until you get to Betsy's card set using a lunch sack. I took the cluster of three roses and die cut it from a 2 inch piece of melon berry dotted pattern paper pack, I also die cut a three leaf stamp..
 I used sweet blush for the solid image, and melon berry for the next two layers, just stamped off once for the second layer so it would be a little softer...my sentiment is from Beautiful Butterflies and it is stamped with memento 'london fog' ink. I love this technique and think it is a gorgeous card with these roses...hmmmm, I may be trying this with other colors now!!
Here is my second card using the beautiful roses from The Sweet Life...I used the technique from Betsy Veldman that she showed during SAF, you can see it on the video HERE, just scroll down until you get to Betsy's card set using a lunch sack. I took the cluster of three roses and die cut it from a 2 inch piece of melon berry dotted pattern paper pack, I also die cut a three leaf stamp..

The Sweet Life

Natural Beauties

So yes, this is the Natural Beauties from the fabulous SAF by Papertrey, Ink. And really the $100 I spent was for paper that I was running very low on, and then a few other essential items, like the star border die that I have been coveting since it's release, and the Harvest Berry Die after seeing what Betsy did with it during the SAF day...so it is all good stuff, KWIM??!!
Thursday, August 2, 2012
Make It Monday #76: Double-time Bleach Stamping

Subscribe to:
Posts (Atom)